IClickhouse & Zookeeper: Docker Compose Made Easy
iClickhouse & Zookeeper: Docker Compose Made Easy
Hey guys! Let’s dive into setting up iClickhouse and Zookeeper using Docker Compose . This combo is super popular for high-performance data warehousing, and Docker Compose makes the whole process a breeze. I’ll walk you through everything, from the initial setup to getting your cluster up and running. If you are struggling with a complex configuration, you’re in the right place. We’ll break it down step-by-step, making it easy to understand even if you’re new to Docker or iClickhouse. Let’s get started!
Table of Contents
- Why iClickhouse and Zookeeper? A Dynamic Duo
- Setting Up Your Environment: Docker and Docker Compose
- Installing Docker and Docker Compose
- Crafting Your docker-compose.yml File
- Explaining the Docker Compose Configuration
- Running Your Cluster: Compose Up and Test
- Troubleshooting Common Issues
- Accessing Your iClickhouse Cluster
- Scaling and Beyond
- Conclusion: Your Journey Begins Here!
Why iClickhouse and Zookeeper? A Dynamic Duo
So, why are iClickhouse and Zookeeper such a dynamic duo, you ask? Well, let me tell you! iClickhouse , the open-source column-oriented database management system, is designed for incredibly fast performance when dealing with large volumes of data. Think of it like a speed demon for your data analysis needs. It’s built to handle petabytes of data efficiently, making it perfect for analytics, real-time dashboards, and more. Then we have Zookeeper , a centralized service for maintaining configuration information, naming, providing distributed synchronization, and group services. It’s like the conductor of an orchestra, ensuring everything runs smoothly in a distributed environment.
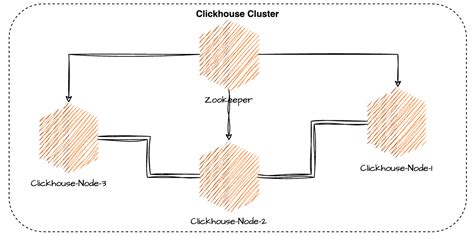
Zookeeper plays a critical role in the iClickhouse ecosystem. It acts as the coordinator, managing the cluster’s state, configurations, and ensuring that all nodes in the cluster agree on the data and operations. This is crucial for maintaining data consistency and fault tolerance. Without Zookeeper, managing a distributed iClickhouse cluster would be incredibly complex and prone to errors. Zookeeper provides a reliable and efficient way to handle these challenges. This makes it an ideal combination for building scalable and robust data solutions. In essence, iClickhouse handles the heavy lifting of storing and querying data, while Zookeeper ensures the cluster operates seamlessly and reliably. Together, they create a powerhouse for data processing and analysis. This combination is especially important when you’re dealing with massive datasets, as the distributed nature of iClickhouse allows you to scale horizontally. Adding more nodes to your cluster becomes much easier with Zookeeper in place, making it a very powerful and flexible setup.
Setting Up Your Environment: Docker and Docker Compose
Before we start, let’s make sure you’ve got the essentials covered. You’ll need Docker and Docker Compose installed on your system. Docker is the platform that allows us to containerize our applications, and Docker Compose simplifies the process of defining and running multi-container Docker applications. Don’t worry, the setup is pretty straightforward, and there are tons of resources available online if you get stuck. Make sure you have the latest versions of Docker and Docker Compose installed. Once you’re set, you’re ready to create a
docker-compose.yml
file. This file will define our services, networks, and volumes, making it the heart of our setup. This is where we’ll tell Docker Compose how to build and run our iClickhouse and Zookeeper containers.
Now, creating the
docker-compose.yml
file is the first step. Open your favorite text editor, and let’s get down to business! Inside this file, we’ll define two main services:
zookeeper
and
clickhouse
. For
zookeeper
, we’ll use an official Zookeeper image. Then, we will configure some necessary environment variables to get Zookeeper up and running. These variables usually include things like the data directory, the client port, and the server IDs. For iClickhouse, we’ll configure the
clickhouse
service to use an official ClickHouse image. But this time we’ll also configure the environment variables that let iClickhouse talk to Zookeeper. Setting up a data directory, enabling remote access, and linking it to our Zookeeper service are key. The volume settings are also very important to make sure your data persists even if the containers restart. Now, let’s get into the details of each service in the next sections!
Installing Docker and Docker Compose
To make things super clear, here’s a quick recap of how to install Docker and Docker Compose. If you are already set up, feel free to skip to the next section. Docker and Docker Compose are essential tools for our project. Let’s make sure you have everything set up. First, ensure Docker is installed. You can download it from the official Docker website for your operating system (Windows, macOS, or Linux). Follow the installation instructions provided there. Once Docker is installed, test it by running
docker --version
in your terminal to confirm it’s working. For Docker Compose, it’s usually included with recent Docker Desktop installations. However, you might need to install it separately, especially on Linux. Check your Docker version by running
docker compose version
in the terminal. If it’s not installed, follow the Docker Compose installation instructions for your operating system, which you can find on the Docker website. With Docker and Docker Compose in place, you’re ready to move on to the next steps and create your
docker-compose.yml
file. Remember, Docker allows us to package our application and its dependencies into containers, while Docker Compose simplifies the management of multi-container applications like iClickhouse and Zookeeper.
Crafting Your docker-compose.yml File
Alright, let’s get down to the nitty-gritty and create our
docker-compose.yml
file. This file is the blueprint for our entire setup, so pay close attention. It will define the services, networks, and volumes that make up our iClickhouse and Zookeeper environment. This is where the magic happens, so let’s get into it.
version: "3.9"
services:
 zookeeper:
 image: zookeeper:latest
 restart: always
 ports:
 - "2181:2181"
 environment:
 - ZOO_MY_ID=1
 - ZOO_SERVERS=server.1:2888:3888
 volumes:
 - zookeeper_data:/data
 clickhouse:
 image: clickhouse/clickhouse-server:latest
 depends_on:
 - zookeeper
 restart: always
 ports:
 - "8123:8123"
 - "9000:9000"
 environment:
 - CLICKHOUSE_DB_USER=default
 - CLICKHOUSE_DB_PASSWORD=password
 - CLICKHOUSE_REMOTE_SERVERS=zookeeper:2181
 volumes:
 - clickhouse_data:/var/lib/clickhouse
 networks:
 - clickhouse_network
volumes:
 zookeeper_data:
 clickhouse_data:
networks:
 clickhouse_network:
Let’s break this down step-by-step. First, we define the
version
of Docker Compose we’re using. Then, we define the services:
zookeeper
and
clickhouse
. For
zookeeper
, we use the official
zookeeper:latest
image, set it to restart automatically, and map port
2181
(the default Zookeeper client port) to our host machine. We also set some crucial environment variables:
ZOO_MY_ID
(unique identifier for the server) and
ZOO_SERVERS
(a list of Zookeeper servers in the ensemble). We use volumes to persist data even if the container restarts. Moving on to
clickhouse
, we also use the official
clickhouse/clickhouse-server:latest
image. We tell it to depend on
zookeeper
(so Zookeeper starts first), map ports
8123
(HTTP interface) and
9000
(native client interface), and set environment variables for the default user, password, and the Zookeeper connection. Finally, we specify volumes for ClickHouse data and define a network for our containers to communicate. This is a very basic setup, but it will get you started! In a production environment, you would want to configure more parameters, such as the number of replicas, security settings, and backups. This gives you a functional iClickhouse cluster that is connected to Zookeeper, ready to store and query your data. It’s a great starting point.
Explaining the Docker Compose Configuration
Let’s go through each part of the
docker-compose.yml
file to fully understand it. We’ll start with the
version
which specifies the Docker Compose file version (3.9 in our case). Next, we have the
services
section, where we define our applications as
zookeeper
and
clickhouse
. For
zookeeper
, we use the
zookeeper:latest
image and specify
restart: always
to ensure Zookeeper restarts if it crashes.
ports
maps the container port 2181 to the host port 2181, which allows us to connect to Zookeeper from outside the container.
environment
sets the necessary environment variables:
ZOO_MY_ID
assigns a unique ID to the Zookeeper instance (this is important for multi-node setups), and
ZOO_SERVERS
defines the Zookeeper ensemble, in this case, a single Zookeeper instance.
volumes
declares a volume named
zookeeper_data
to persist Zookeeper data on the host machine. For
clickhouse
, we use the
clickhouse/clickhouse-server:latest
image.
depends_on: - zookeeper
ensures that ClickHouse starts after Zookeeper.
ports
maps container ports 8123 and 9000 to the host.
environment
sets environment variables, including the
CLICKHOUSE_DB_USER
and
CLICKHOUSE_DB_PASSWORD
for the default user and password, and
CLICKHOUSE_REMOTE_SERVERS
to connect ClickHouse to Zookeeper. Finally, we declare a volume
clickhouse_data
for persisting ClickHouse data and a network
clickhouse_network
for container communication.
Running Your Cluster: Compose Up and Test
Now that we’ve crafted our
docker-compose.yml
file, it’s time to bring our cluster to life! This is where you actually get to see your work in action. The good news is that it’s super simple. Open your terminal, navigate to the directory where you saved the
docker-compose.yml
file, and run the following command. The command we’re going to use is your magic key to launching the cluster.
docker-compose up -d
This command tells Docker Compose to build and start the containers defined in your
docker-compose.yml
file. The
-d
flag runs the containers in detached mode, meaning they’ll run in the background. If everything goes well, you should see Docker Compose pulling the images and creating the containers. After the process is completed, you can check that everything is running smoothly using the
docker ps
command. This will list all the running containers. You should see both
zookeeper
and
clickhouse
containers in the list. Now, let’s test our setup! You can use the
clickhouse-client
to connect to your iClickhouse instance. This is a command-line tool that comes with ClickHouse. To connect, simply run:
clickhouse-client -h localhost --user default --password password
. Once you’re connected, you can run SQL queries to check that everything works. Try running a simple query like
SELECT version()
. If it returns the ClickHouse version, congratulations! Your cluster is up and running. If you encounter any problems, double-check your
docker-compose.yml
file and the output from the
docker-compose up
command for any error messages. Debugging is a normal part of the process, and understanding the error logs will help you resolve any issues quickly. You can also use the Docker logs command, such as
docker logs <container_name>
, to view the logs for a specific container and get additional information about any problems. This will help you identify the root cause of the problem.
Troubleshooting Common Issues
Even with the best planning, you might run into some snags. Let’s cover some common issues and how to troubleshoot them. If you’re having trouble starting your cluster, the first step is always to check the logs. Use the command
docker logs <container_name>
to view the logs for the
zookeeper
and
clickhouse
containers. Look for any error messages. Also, check that your ports aren’t already in use by another application. This can prevent the containers from starting correctly. Make sure that the ports specified in your
docker-compose.yml
are not being used by any other applications on your system. You can use tools like
netstat
or
lsof
to identify which processes are using certain ports. Configuration errors are another potential source of problems. If ClickHouse can’t connect to Zookeeper, double-check the
CLICKHOUSE_REMOTE_SERVERS
setting in your
docker-compose.yml
. Make sure that the hostname and port are correct. Incorrectly formatted environment variables can also lead to issues. Pay attention to case sensitivity and make sure all required variables are set. If you are still struggling, try removing the containers and volumes and starting again. This will ensure you’re starting from a clean slate. Sometimes, a simple restart is the easiest way to fix unexpected issues. Don’t be afraid to consult the official documentation for both iClickhouse and Zookeeper for more detailed guidance. Remember, these tools have extensive documentation, so use it. Persistence and careful troubleshooting will help you to overcome any obstacles and get your cluster up and running.
Accessing Your iClickhouse Cluster
Once your iClickhouse cluster is running, the next step is accessing it. You’ve got several ways to do this, depending on what you need. The most basic method is using the
clickhouse-client
command-line tool. This tool comes with the ClickHouse server and allows you to connect to the database from your terminal. Use the command
clickhouse-client -h localhost --user default --password password
. Replace localhost with the IP address or hostname of your ClickHouse server if it’s running on a different machine. When you’re connected, you can run SQL queries to interact with your data. The connection details, like user and password, are often specified in the environment variables of your
docker-compose.yml
file. Another way to interact with your cluster is through a web interface. ClickHouse provides an HTTP interface on port 8123 (by default). You can access this port from your web browser to execute SQL queries and view results. To connect to the HTTP interface, open your web browser and navigate to
http://localhost:8123/
. You can also use external tools to connect. Many SQL clients, such as DBeaver, DataGrip, and others, support ClickHouse. To connect, you’ll need the hostname (or IP address), port (9000 by default for native client), and connection details (user, password). These tools often provide a more user-friendly interface for managing your database and analyzing your data. This is where you can start loading your data and running your queries. You’ll be able to view the results in your preferred interface.
Scaling and Beyond
Congratulations! You’ve successfully set up iClickhouse and Zookeeper using Docker Compose. But what’s next? Well, the beauty of this setup is that it’s designed to scale. As your data grows, you can easily scale your iClickhouse cluster. You’ll add more ClickHouse server instances. To do this, modify your
docker-compose.yml
file to include multiple
clickhouse
services. You’ll need to configure these instances to form a cluster, which involves setting up replication and sharding. This can be complex, and you might need to adjust the configuration for the
ZOO_SERVERS
variable in your
zookeeper
service. Always ensure Zookeeper is configured properly. Beyond scaling, consider more advanced configurations. Implement security measures to protect your data. Use SSL/TLS encryption for secure communication. Set up backups and monitoring to maintain data integrity and performance. You could also explore different data ingestion methods, such as using Kafka or other streaming platforms, to load your data into iClickhouse. And finally, keep learning. iClickhouse and Zookeeper are constantly evolving, with new features and improvements being added regularly. The official documentation is your best friend. Make sure you regularly update your images and explore the latest features to make the most of your cluster. By mastering these basics, you’re well on your way to building powerful and scalable data solutions with iClickhouse and Zookeeper.
Conclusion: Your Journey Begins Here!
Alright guys, we’ve reached the end of our journey for now. We covered how to get iClickhouse and Zookeeper up and running with Docker Compose. You’ve learned the basics of setting up the services, configuring them, and even accessing your cluster. Remember, this is just the beginning. The world of data warehousing is vast, and there’s always more to learn and explore. You can start by playing around with your setup. Try loading some data, experimenting with queries, and seeing how iClickhouse handles it. As you become more comfortable, explore advanced topics such as data replication, sharding, and security. Consider using monitoring tools to keep an eye on your cluster’s performance and health. Remember to always consult the official documentation for both iClickhouse and Zookeeper. And of course, keep experimenting, keep learning, and keep building. I hope this guide has been helpful. If you have any questions, feel free to ask. Happy data warehousing!
